dessert

Tiramisu for Daring Bakers February 2010

Tiramisu Close up

The February 2010 Daring Bakers’ challenge was hosted by Aparna of My Diverse Kitchen and Deeba of Passionate About Baking. They chose Tiramisu as the challenge for the month. Their challenge recipe is based on recipes from The Washington Post, Cordon Bleu at Home and Baking Obsession.

Weird, how someone, somewhere reads your mind, isn't it? Take for instance, this Daring Bakers challenge. I have been meaning to make Tiramisu ever since I first saw it so prettily displayed at our neighbourhood Italian bakery. Gorgeous individual portions of, what to me looked like, layered mousse and biscuits. I wanted to recreate all that lovely-ness. Now, just how did Deeba and Aparna know my inner mind workings, I don't know. Perhaps, there is some sort of metaphysical connection between us... Hmmmmm..

So, if you are wondering why I am rambling on about minds, metaphysics and such... It's just the influence of Dan Brown's latest in the Langdon series. He has opened my eyes to this whole new (to me) world of "Noetic Science". Apparently, the field really exists and not a mere figment of his imagination (oh!! soo many puns in that sentence!). I googled.. Even Wikipedia has an article on Noetic Theory (Quid Pro Quo!). The basic hypothesis (and belief) behind the science is that the human mind is capable of physical change through the power of thinking!

Rather cool, I think. Well, we'll just have to wait and see how much of it can be scientifically proven. So, anyway, the book is all over it. And Mr. Brown, being who he is draws a ton of parallels between it, the Masons and the religions of the world. Decent book; I am about two-thirds through it and while not compelling or un-put-down-able, it's an interesting read. Maybe, there will be a twist in the end...

Tiramisu

Anyway, back to the subject of the post, the Tiramisu. I chose to make individual portions for two reasons. One, that's how it looks in the store. Two, I had been looking for an opportunity to use the pastry rings that Deeba had sent me when I was in India. It's was a pre-ordained match - the rings and a challenge co-hosted by her! Circles within circles, or what! :)

I pretty much followed the recipe. The only changes I made were using rum instead of marsala wine for the zabaglione, rum-ed coffee for soaking the savoiardi, orange zest for flavoring (no extracts at all) and chocolate whipped cream because I had some left over from making something else. The last is why my cream doesn't look yellow but a more muddled color. But, take my word, it tasted fantastic!

It was rather an elaborate process, with many different components that all come together nicely for a rich dessert. The savoiardis were ok for me; a bit too eggy eaten as is but gave a nice sponginess and body to the tiramisu. The mascarpone was creamy and rich. And yes, I panicked when I was making it because it didn't seem to be doing anything but after the refrigeration, it firmed up so nicely! I made extra, so happy!
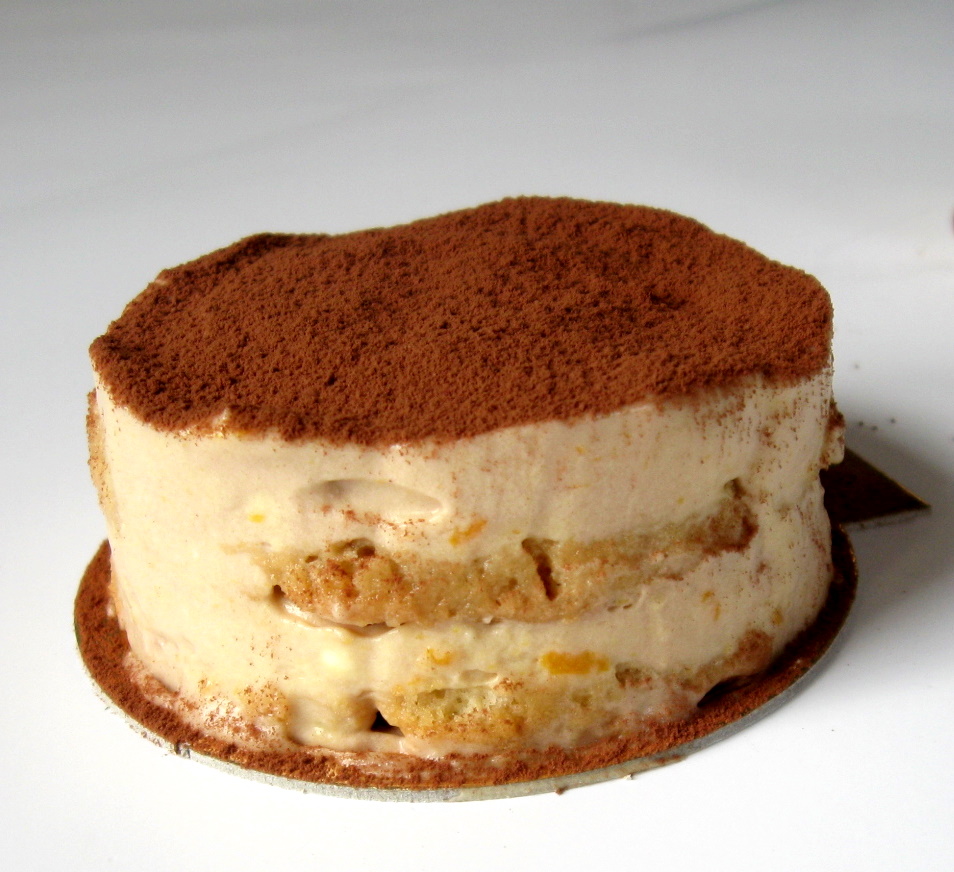
Tiramisu single

You know the funny thing; for all my wanting to make tiramisu, I honestly don't remember tasting one or if I have (as Mr. FSK insists), it's actual taste. So, I don't know how this creation compares to the store. But, it was real good, stand alone!

Now, the litmus test is a couple of friends who just love Tiramisu. I saved a portion for them. My fingers are crossed and I'll keep you updated on the results! :) Meanwhile, enjoy my creation and visit the Daring Kitchen for everyone's gorgeous creations!!

The recipe below includes the tweeks I made for the individual portions.

Tiramisu
(Recipe source: Carminantonio's Tiramisu from The Washington Post, July 11 2007)
Makes 3-4 individual serves depending on size

For the zabaglione:
1 large egg yolks
1.5 T sugar
1/8 cup rum
1/2 tsp orange zest

For the vanilla pastry cream: (this makes twice the amount needed)
1/4 cup sugar
1 T all purpose flour
3/4 tsp finely grated orange zest
1 large egg yolk
3/4 cup whole milk

For the whipped cream:
1/2 cup chilled heavy cream (we used 25%)
1/8 cup powdered sugar
1/2 T unsweetened cocoa powder

To assemble the tiramisu:
1/2 cup brewed espresso, warmed
1 T rum extract
1/4 cup sugar
1/6 cup mascarpone cheese
20-25 savoiardi/ladyfinger biscuits (you may use less)
2 tablespoons unsweetened cocoa powder

To make the zabaglione:

Heat water in a double boiler. If you don’t have a double boiler, place a pot with about an inch of water in it on the stove. Place a heat-proof bowl in the pot making sure the bottom does not touch the water.

In a large mixing bowl (or stainless steel mixing bowl), mix together the egg yolks, sugar, rum and zest. Whisk together until the yolks are fully blended and the mixture looks smooth.

Transfer the mixture to the top of a double boiler or place your bowl over the pan/ pot with simmering water. Cook the egg mixture over low heat, stirring constantly, for about 8 minutes or until it resembles thick custard. It may bubble a bit as it reaches that consistency.

Let cool to room temperature and transfer the zabaglione to a bowl. Cover and refrigerate at least 4 hours or overnight, until thoroughly chilled.

To make the pastry cream:

Mix together the sugar, flour and zest in a medium heavy-bottomed saucepan. To this add the egg yolk and half the milk. Whisk until smooth. Now place the saucepan over low heat and cook, stirring constantly to prevent the mixture from curdling.

Add the remaining milk a little at a time, still stirring constantly. After about 12 minutes the mixture will be thick, free of lumps and beginning to bubble. (If you have a few lumps, don’t worry. You can push the cream through a fine-mesh strainer.)

Transfer the pastry cream to a bowl and cool to room temperature. Cover with plastic film and refrigerate at least 4 hours or overnight, until thoroughly chilled.

To make the whipped cream:

Combine the cream, cocoa and sugar in a mixing bowl. Set aside for 5 minutes. Beat with an electric hand mixer or immersion blender until the mixture holds stiff peaks. Set aside.

To assemble the tiramisu: (individual portions)

Place the pastry rings/molds on base. Mix together the warm espresso, rum extract and sugar in a shallow dish, whisking to mix well. Set aside to cool.

In a large bowl, beat the mascarpone cheese with a spoon to break down the lumps and make it smooth. This will make it easier to fold. Add the prepared and chilled zabaglione and pastry cream, blending until just combined. Gently fold in the whipped cream. Set this cream mixture aside.

Now to start assembling the tiramisu.

Working quickly, each ladyfinger in the sweetened espresso, about 1 second per side. They should be moist but not soggy. Immediately transfer each ladyfinger to the inside of the dessert ring, placing them side by side in a single row. You may break a lady finger into two, if necessary, to ensure the base of your dish is completely covered.

Spoon some of the cream mixture on top of the ladyfingers, then use a rubber spatula or spreading knife to cover the top evenly, all the way to the edges. Repeat to create one or more layers, alternating the ladyfingers and the cream mixture for each layer. Clean any spilled cream mixture; cover carefully with plastic wrap and refrigerate the tiramisu overnight.

To serve, carefully remove the plastic wrap. Run a sharp paring knife along the inner edges of the ring and ease it up. The tiramisu will stay on the base. Sprinkle the top with cocoa powder using a fine-mesh strainer or decorate as you please.


Mascarpone Cheese
(Source: Vera’s Recipe for Homemade Mascarpone Cheese)
This recipe makes twice the amount you need for the Tiramisu

1 cup whipping (36 %) pasteurized (not ultra-pasteurized), preferably organic cream
1/2 to 1 T fresh lemon juice

Bring 1 inch of water to a boil in a wide skillet. Reduce the heat to medium-low so the water is barely simmering. Pour the cream into a medium heat-resistant bowl, then place the bowl into the skillet. Heat the cream, stirring often, to 190 F. If you do not have a thermometer, wait until small bubbles keep trying to push up to the surface.

It will take about 15 minutes of delicate heating. Add the lemon juice and continue heating the mixture, stirring gently, until the cream curdles. Do not expect the same action as you see during ricotta cheese making. All that the whipping cream will do is become thicker, like a well-done crème anglaise. It will cover a back of your wooden spoon thickly. You will see just a few clear whey streaks when you stir.

Remove the bowl from the water and let cool for about 20 minutes. Meanwhile, line a sieve with four layers of dampened cheesecloth and set it over a bowl. Transfer the mixture into the lined sieve. Do not squeeze the cheese in the cheesecloth or press on its surface (be patient, it will firm up after refrigeration time).

Once cooled completely, cover with plastic wrap and refrigerate (in the sieve) overnight or up to 24 hours.


Savoiardi Biscuits/ Ladyfingers
(Source: Recipe from Cordon Bleu At Home)
This recipe makes approximately 24 big ladyfingers or 45 small (2 1/2" to 3" long) ladyfingers.

3 eggs, separated
6 tablespoons /75gms granulated sugar
3/4 cup/95gms cake flour, sifted (or 3/4 cup all purpose flour + 2 tbsp corn starch)
6 tablespoons /50gms confectioner's sugar,

Preheat your oven to 350 F (175 C) degrees, then lightly brush 2 baking sheets with oil or softened butter and line with parchment paper. Beat the egg whites using a hand held electric mixer until stiff peaks form. Gradually add granulate sugar and continue beating until the egg whites become stiff again, glossy and smooth.

In a small bowl, beat the egg yolks lightly with a fork and fold them into the meringue, using a wooden spoon. Sift the flour over this mixture and fold gently until just mixed. It is important to fold very gently and not overdo the folding. Otherwise the batter would deflate and lose volume resulting in ladyfingers which are flat and not spongy.

Fit a pastry bag with a plain tip (or just snip the end off; you could also use a Ziploc bag) and fill with the batter. Pipe the batter into 5" long and 3/4" wide strips leaving about 1" space in between the strips.

Sprinkle half the confectioner's sugar over the ladyfingers and wait for 5 minutes. The sugar will pearl or look wet and glisten. Now sprinkle the remaining sugar. This helps to give the ladyfingers their characteristic crispness. Hold the parchment paper in place with your thumb and lift one side of the baking sheet and gently tap it on the work surface to remove excess sprinkled sugar.

Bake the ladyfingers for 10 minutes, then rotate the sheets and bake for another 5 minutes or so until the puff up, turn lightly golden brown and are still soft. Allow them to cool slightly on the sheets for about 5 minutes and then remove the ladyfingers from the baking sheet with a metal spatula while still hot, and cool on a rack.

Store them in an airtight container till required. They should keep for 2 to 3 weeks.

I Heart Thee - Couple's Velvet Cake {Valentine's Day Post}

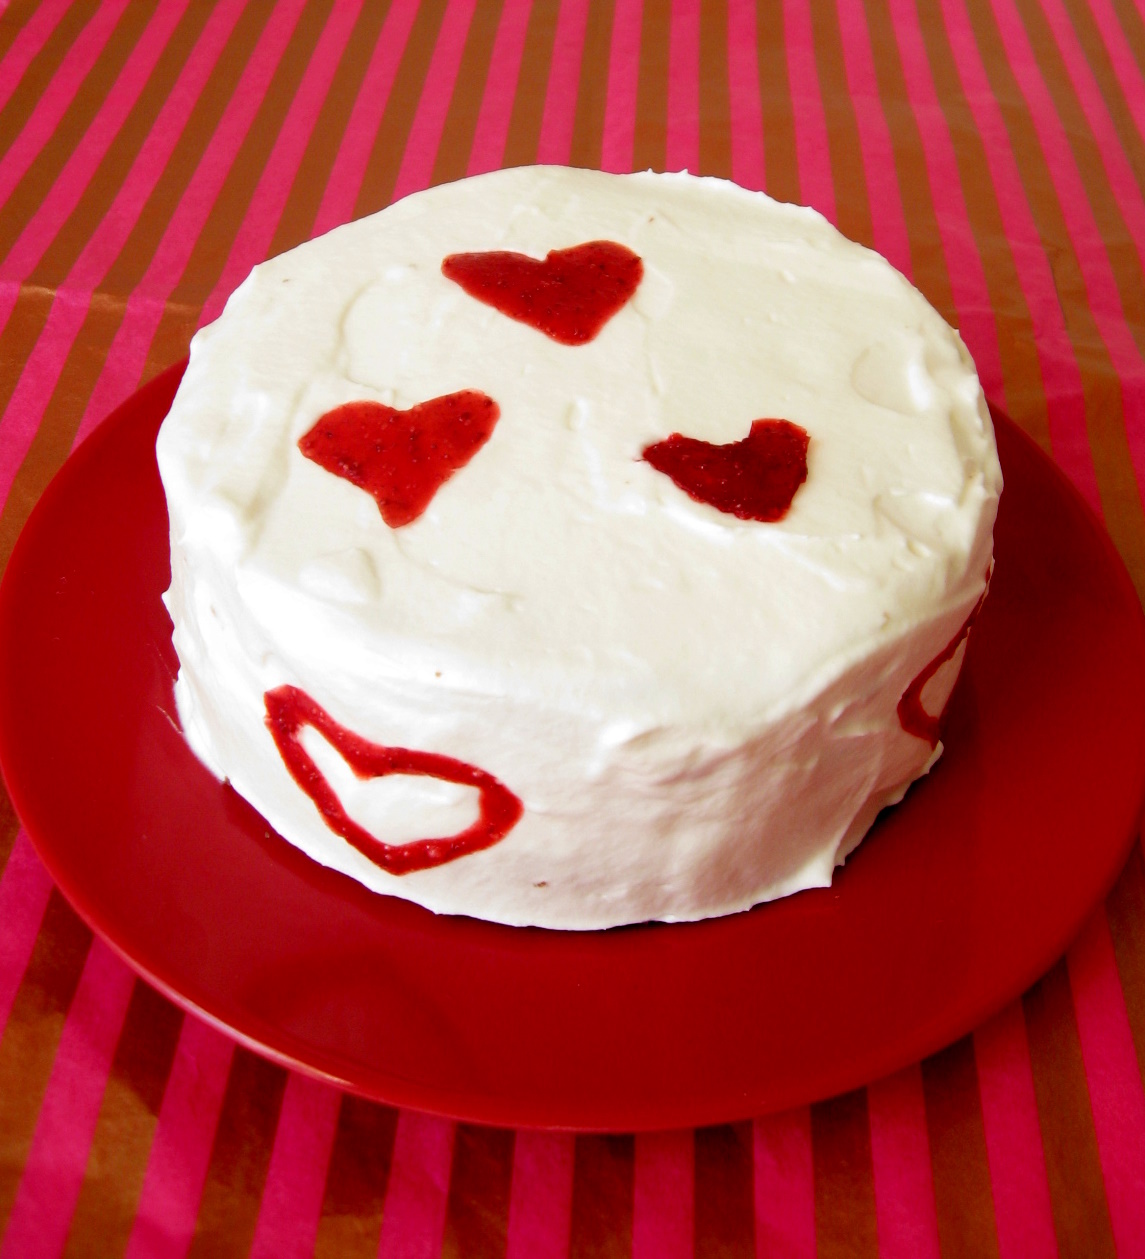
Couple's Velvet Cake

YAY! This cake got voted to FoodBuzz Top 9 on 14 Feb 2010. Thanks for all the LOVE!!


With Valentine's day just a couple of days away, the blogosphere is filled with yummy things Red and lovely. It isn't surprising that the spirit carried over to the Twitter World. What with mouth watering posts popping up all over from tweet friends, it was only inevitable that one starts thinking up stuff for the cause, even though Mr. FSK and I do not observe the "day" (that is only 'coz our anniversary is a few days earlier! :)).

So when Aparna asked me if I wanted to bake a red velvet cake in time for V-day with fellow Velveteers, Pam and Alessio, I jumped on it. Truth be told, I have not found the cake very appealing primarily because of the amount of artificial coloring that goes into it. Somehow, the idea of making it red by adding a poundful of color just didn't seem right. But, I remembered the history of the cake and the color from a Throwdown episode I had seen a while back and I wanted to try my hand at some of this practical chemistry (it was one of favorite subjects in school.. Loved organic chemistry, not so much inorganic).

The original cake made eons ago, relied on the reaction between the buttermilk and vinegar in combination with the chocolate to produce the reddish tinge that gave the cake the name. I wanted to have some fun with food chemistry and the rule to NOT use artificial coloring for baking with these awesome bloggers was just the right motivation.

So, I did research. I found out that to have any chance of the natural reaction, I needed to use regular cocoa and not the Dutch processed (which is usually coveted) because of the latter's alkaline nature. Fortunately, that was the cocoa I had at home. Then I learnt that the cultured buttermilk that you get in the stores are pretty tame pH wise to cause a pop. So, I decided to make my own buttermilk...

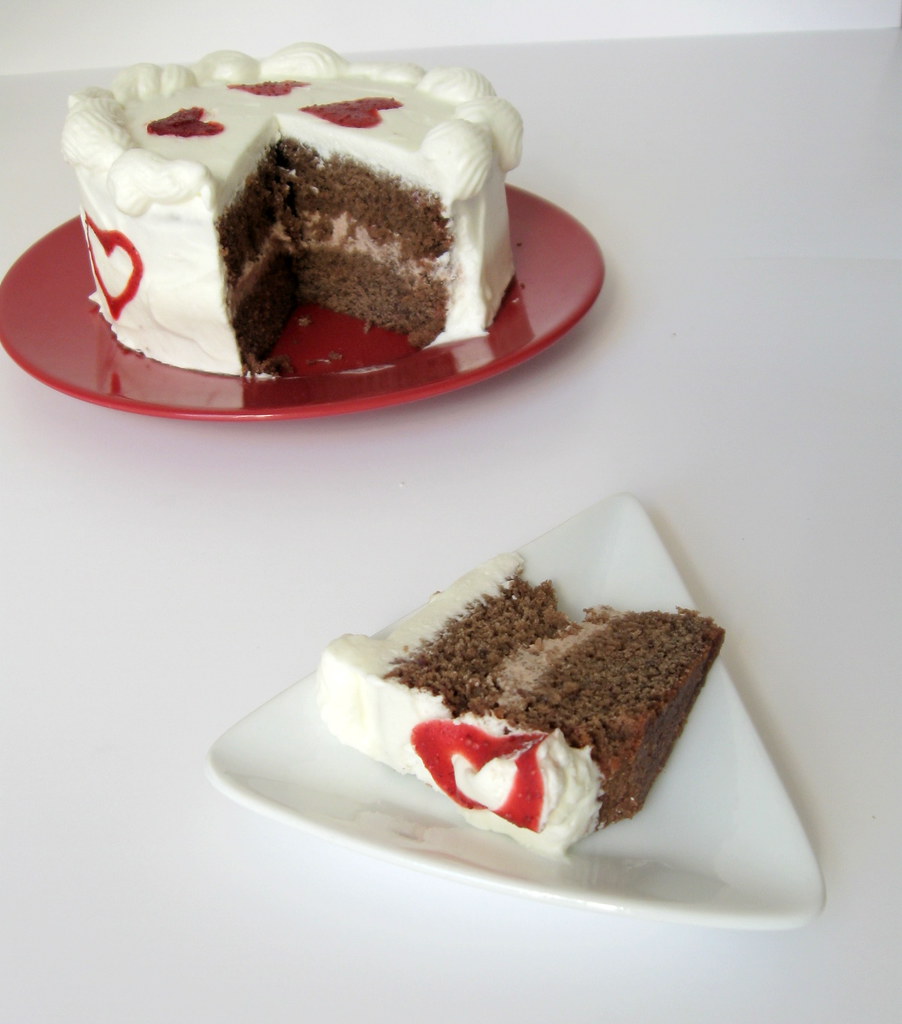
Velvet cake sliced
Clearly I have quite a ways to go on piping frosting prettily!


I remember my mom used to skim the cream off the boiled milk everyday and store it in a jar till there was enough to make butter. Then she would churn it by hand to separate the butter and buttermilk. A major portion of that butter would then be converted to ghee. It all seemed a long, tedious process to me and I was a bit deflated, at first, when I realised I had to make buttermilk.

Glory to Google, it wasn't to be so bad! This day and age, all you do is add heavy cream to the blender and whip at high speed, till the butter separates out. It was such a cool feeling!! The nice part is you can use the butter and the buttermilk you make in this cake. Now, nothing can beat all that homemade LOVE!!! :))

So, I was set and ready to bake. I whisked the buttermilk and vinegar, but, nothing seemed to happen, even after upping the amount of vinegar. I proceeded anyway and made the batter which was not quite the chocolate cake color but a duller brown, with a very very slight slant to red (or perhaps that was just me hoping!). Anyway, I wanted something red in it, so I added a couple of tablespoons of mashed thawed raspberries. They didn't do much to the overall color, just a few flecks of red here and there but I think they added to the moisture of the cake.

Now for the decoration. Typical frosting for red velvet cake is cream cheese based. But, I am not a big fan of it because cream cheese has a pronounced tang which needs a ton of sugar to make sweet. So I decided to go with a whipped cream frosting which is way lighter as well and lends better to delicate flavors.


Slice and sliced cake

Since it was a chocolate cake of sorts, I made the inside filling of chocolate & rum whipped cream and the outer frosting of rose whipped cream; rose being the symbolism for the day and all. Besides, I like rose flavor (love rose milk!). And, since I am mischievious by nature, I decided to go over the top and decorate with mini-hearts made of strawberry gelee. LOL..

Alhtough the cake did not come out red, it sure was velvety. The texture was serious melt-in-your-mouth. I think the buttermilk adds to the nice texture (Check out Alessio's post for an actual lesson in food chemistry.. fantastic!). There was just a hint of chocolate, which I didn't mind at all. And I loved the cream frosting; it was light, airy and mild (oh and rum soaked..haha). This is now my favorite cake recipe.

All in all, I thoroughly enjoyed working with the cake and giving in to some whimsical fancies, even if I failed at the chemistry (hey! it's all about the learning, not the grades, right?!).

Check out what the other Velveteers have created, all naturally colored -

Aparna - Eggless Red Velvet Cake
Pam - Red Velvet Cake (with beetroot juice)
Alessio - Raspberries Red Velvet Cake


Velvet Cake For Two

** Since it's for a couple, I sized it accordingly, you can triple portions for a 9 inch cake.

I was generous with the alcohol given the occasion. For a kid-friendly version, skip the alcohol**

Cake:
(Recipe adapted from Epicurious)

3/4 cup sifted cake flour (or 3/4 minus 2 T cup AP flour plus 2 T corn starch)
1 T unsweetened cocoa powder (natural, not Dutch processed)
1/3 tsp baking powder
1/3 tsp baking soda
pinch of salt
1/3 cup buttermilk
1 tsp distilled white vinegar
1/2 tsp almond extract
1/2 cup sugar
3 T unsalted butter, room temperature
1 egg, room temperature
2 T mashed, thawed raspberries

5 T rum
5 T water
1 T sugar

Preheat oven to 350°F. Butter and flour a 5inch by 3 inch cake pan. Sift together the flour, cocoa, baking powder, baking soda, and salt. Whisk buttermilk, vinegar, and extract in a small bowl. Using an electric mixer, beat sugar and butter in large bowl until well blended. Add the egg, beating until well blended. Add in dry ingredients alternating with the buttermilk mixture starting and ending with the dry. Beat in the mashed raspberries.

Pour batter into the pan (there may be a bit more than can fit. Don't over stuff). Bake for 30-35 minutes or until tester comes out clean. Cool in pans on racks 10 minutes. Turn cakes out onto racks and cool completely. Meanwhile, mix together the water, rum and sugar and set to cool.

Using a cake knife cut the cake into two horizontally (you can also bake in two pans. I only have one). Pour the rum mixture evenly on both halves and let it soak in. Generously spread the chocolate cream onto the base layer making it slightly thicker in the center as it will spread when the second layer is placed. Gently place the top layer and coat with a thick layer of the rose cream frosting. Decorate with strawberry hearts.

Frosting:

Chocolate and Rum Cream
1/2 cup heavy whipping cream
2 tsp unsweetened cocoa
1/3 cup + 2 T powdered sugar
2 T rum

Add the cocoa and rum to the cream and set aside for 5 minutes in the refrigerator. Start whipping at low speed and increase to the highest speed on your mixer. When it has doubled in volume, add the sugar slowly. Continue whipping until soft peaks form. Cool for atleast 15 minutes before spreading on cake.

Rose Cream
3/4 cup heavy cream
1/2 cup powdered sugar
1 T rose water

Use same procedure as above

Strawberry gelee hearts

1/4 cup strawberry puree
1/4 cup water
1-1/4 tsp gelatin

Bring the puree and water to a boil. Off the heat, add gelatin, whisk to incorporate completely. Cool to room temperature and then cool in fridge till it is just starting to set is fluid enough to pipe.

Pour into a ziplock bag. Make a tiny cut and pipe hearts onto a silpat sheet. Cool overnight to set. Peel off the hearts and place on frosting.


Roasted Butternut Squash and Apple Mini Cakes

YAY!! These cakes were voted on to FoodBuzz Top 9 on 13 Jan 2009!!!! :))))

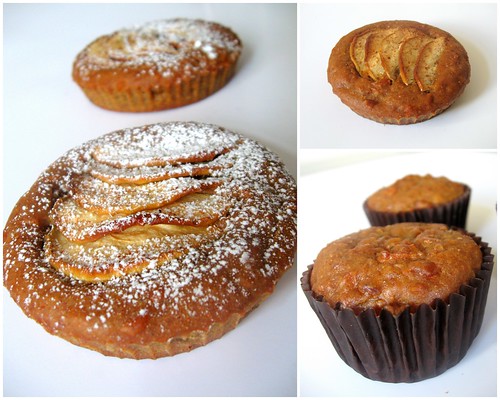
butternut squash & apple cake

Good Morning everyone! Ok, I know it's afternoon even in this part of the world but hey, it's still morning on the West Coast! So, I am covered. Anyway, I consider morning as the few hours that follow my waking up, irrespective of when that falls in the traditional day cycle. hehe..

Ah well, I blame the cold for this out-of-the-box thinking ;-). NYC is at its coldest, of the last five years I have been here, and it really makes it more appealing to stay tucked in warm and cozy. Then, once up, it's time to browse my favorite food blogs and drool over the photos, learn of a new recipe that needs to be tried out very soonly and then perhaps actually getting around making it. Besides, I have had a lot of catching up to do on blog reading since my vacation days.


So, when I came across Meeta's call to make something of Winter Vegetables and Fruit for her Monthly Mingle, I was super thrilled. You see, I had made mini cakes with squash and apples sometime back and had not found the opportunity to post about them. And here was the perfect time to talk about them. This month's mingle is being hosted by Sudeshna of Cook Like A Bong.

apple & squash cake

And what a close call?! Just a day before the doors closed! I can just hear them slowly closing and me just about wiggling through like in the movies. ok, yes yes, hyper active imagination and all, I know .. :)

Ok, so without further ado, let me introduce my Roasted Butternut Squash and Apple Mini Cakes. Why mini-cakes? Well, I went to the baking supply store and saw these cute 3 inch shallow paper molds and just had to use them! :) And, the squash because I like the sweetness that roasting brings out of it and thought it would add great flavor and moisture to the cake itself.

butternut squash and apple cake


Roasted Butternut Squash and Apple Mini Cakes

(makes about five 3-inch cakes)

1 small butter nut squash, peeled and diced, about 1-1/2 cups
1 golden delicious apple, peeled and diced + a few thinly sliced to arrange on top
1 cup all purpose flour
6 T melted butter
2 eggs
1 T cocoa powder
1/2 cup brown sugar + 2 T for roasting the squash
4 T milk
1 tsp baking soda

Preheat oven to 350 F degrees. Toss the diced squash in 2 tablespoons of brown sugar and roast for 20-30 minutes until caramelised. Remove the squash and keep the oven on.

Sift the dry ingredients (flour, cocoa, baking soda) together. Add the butter, milk, sugar and eggs and whip to a smooth batter. Fold in the roasted squash and apples into the batter.

Pour into buttered molds and bake for 30 minutes. Let cool to room temperature, dust with powdered sugar and enjoy!

Romancing with Rose & Basil Seed Macarons with Cherry Cream Cheese

Rose & Basil Macs with cherry cream cheese filling - first pic 2

I am in Chennai now.. where is the weather is just pleasant enough to sit comfortably without a fan and the cool evening breeze from the sea makes the leaves on the trees in my garden sway to an enchanting tune. Ofcourse, I am also being happily pampered by the family in every which way; lots of good food and my every wish fulfilled immediately. And, I have a good few weeks of this to cherish. Oh it's bliss! Ok, perhaps it won't last forever; once the novelty of my presence wears off but until then I am enjoying it all very very much! :)

I landed here yesterday and am still soaking in everything, including the time zone. So far, I have been walking through the day in a sorta jet lagged haze.. I wake up, eat, sleep, eat, sleep and try to get to used to the new day and night system. Pretty good living eh?! I think so too. I'll be fine in a couple of days though, fret not! :)


Now, despite all that, I cannot ignore my blog and leave all you loyal readers (surely there is one?!) hanging until I get back to the States? No siree, that isn't done! So, I made a few things, before departing on my vacation, to be posted about, in leisure, this month.

So, am starting off with Macarons! Remember my tribulations and eventual triumph, with Cardamom and Ganache macarons, in making this delicate French desserts?! Even as I was whooping with joy in October over having made a successful batch of these tricky treats, I decided that I would not be a one-trick pony. I have to recreate that magic if only to justify the baker in me. I must show who is the master and ofcourse the thought of playing with new flavor combinations just made it all very appealing.

Rose Mac shells

Jamie's and Deeba's call for a monthly macaron challenge, Mac Attack, served just the perfect excuse to try my hand at them again. They have dedicated a whole blog, MACTWEETS, to macs with a lot of information on getting it right. And ofcourse, a blogroll of all the wonderful and creative Mac Bakers!

My entry for this month's challenge is Rose and Basil Seed Macaron with Cherry Cream Cheese filling. The inspiration behind it was the Indian Falooda. Falooda is a refreshing summer drink made with cold rose milk, vermicelli and puffed basil seeds. It is an adaptation of the Persian dessert Faloodeh and was brought to the Indian subcontinent during the Mughal period. I love rose milk and the basil seeds add an interesting texture element like the tapioca baubles in Chinese bubble tea!

Macs in a line

I had a packet of Falooda mix at home and it struck me that it would great flavor experiment for macarons! And, so it came to be. For this challenge, I also wanted to stress test my learnings from my last success. My first few unsuccessful attempts were with Helen's recipe and I wanted to try the recipe again and see if I had after all grown in macaron baking. Oh! I am happy to report that it worked. I am not a one-trick pony after all!!!

So ladies and gentlemen, without further ado, I present to you my newest Mac creation! :) Much love to you all!

Before you go, I have another piece of news to share. Foodista has invited me to contribute to their Best of Food Blogs Cookbook. This is a real dream opportunity for me but to make it real, I need your help in voting for me and my recipes to be part of the book. I have submitted some of my favorites. I will be greatly obliged to you if you could vote for me! Thanks very much for your love!!

Kaju Barfi Indian Cashew Fudge (Kaju Barfi) - Vote here

Pesto RollsPesto Rolls - Vote here

Pumkin barley risottoRoasted Pumpkin and Barley Risotto - Vote here

mango & Saffron ice creamMango and Saffron Ice Cream - Vote here


Rose and Basil Seed Macarons with Cherry Cream Cheese

**
I used rose sugar for flavoring. If you can't find any, you can use 1/2 tsp of rose extract. Add to the egg whites and whip as per directions.
**

For the macarons shells:
basic macaron shell recipe adapted from
Tartelette)

1 egg white
1 T granulated sugar
1/2 cup + 1/2 T powdered sugar
1/3 cup + 1/2 T ground almonds
2 tsp rose flavored sugar for the meringue
2 tsp rose flavored sugar + 1/2 tsp basil seeds for garnish

For the whites: the day before (24hrs), separate your eggs and store the whites at room temperature in a covered container. If you want to use 48hrs (or more) egg whites, you can store them in the fridge.

In a stand mixer fitted with the whisk attachment, whip the egg whites to a foam, gradually add the sugar until you obtain a glossy meringue. Do not over beat your meringue or it will be too dry. Combine the almonds and powdered sugar in a food processor and give them a good pulse until the nuts are finely ground. Add them to the meringue, give it a quick fold to break some of the air and then fold the mass carefully until you obtain a batter that flows like lava or a thick ribbon. Give quick strokes at first to break the mass and slow down. The whole process should not take more than 50 strokes.

Test a small amount on a plate: if the tops flattens on its own you are good to go. If there is a small beak, give the batter a couple of turns.

Fill a pastry bag fitted with a plain tip (Ateco #807 or #809) with the batter and pipe small rounds (1.5 inches in diameter) onto parchment paper or silicone mats lined baking sheets. Sprinkle with the crushed sugar or violet petals. Preheat the oven to 280F. Let the macarons sit out for 30 minutes to an hour to harden their shells a bit and bake for 15 to 20 minutes, depending on their size.

Let cool. If you have trouble removing the shells, pour a couple of drops of water under the parchment paper while the sheet is still a bit warm and the macarons will lift up more easily do to the moisture. Don't let them sit there in it too long or they will become soggy. Once baked and if you are not using them right away, store them in an airtight container out of the fridge for a couple of days or in the freezer. To fill: pipe or spoon about 1 big tablespoon of butterceam in the center of one shell and top with another one.


Cherry Cream Cheese filling

1-1/2 oz cream cheese at room temperature
1 T butter at room temperature
1/8 tsp burgundy powder food color
2 tsp kirsch or cherry liqueur
4 T powdered sugar

Whip the ingredients together to make a smooth paste. Refrigerate until ready to use. Fill a ziplock bag and snip off a small bit. Pipe out the filling onto the cooled macaron shells. Top with another and press gently to seal.


Mac Love

Celebrating Fall with Apple Angel Cake


There is usually a story inspiring my posts? Some have a good plot, with attention arresting twists and turns while quite a few eh not much to write home about. Still, there is the story.

I really don't have any for this one. It is just Fall and that means apples and pumpkins and all things warm and cozy; Freshly baked just fits the theme and has an all-new allure. I mean, you just can't let Fall and the fresh nip in the air go by without saluting it with a warm baked apple, can you?! Nooo...


I still had apples from the nice big bucket we picked up at the farm. So, I was thinking, pie, but then, it just seemed too cliched. I know, it is a cliche only coz it works... everytime! But, still, I am thrill seeker and I wanted a new rush. So I thought, cake. Yes I know, nothing imaginative in that but with the twist of making it light and airy with a nice caramalised top of apples, the idea really appealed.

And, so it came to be; Angel Cake with Apples,Nuts and a hint of spice.


Traditionally, angel cakes are made in tube pans, which, I don't own. I made mine in a nice tall souffle dish over a bed of marinated apples and then just turned it over.

I really love the cake. It is fluffy and angel-like as intended and has a deep seductive spice note to it and ofcourse the apples... they are indeed the star and they shine .. shine on like a crazy diamond... isn't Fall just the mood for some Floyd?!

And, now if you'll excuse me, am off for another slice.. It is tea time! :)


Apple Angel Cake

**
I used a souffle dish to bake. If you have a tube pan, go for the traditional look.

If the apples don't look caramelised enough when you turn the cake upside down, stick it in the oven for 5 minutes at the highest temperature on the top rack.

**
4 macintosh apples
1-2/3 scant cups of flour
1 cup sugar
1 T honey
3 egg yolks
2 egg whites
2-1/2 scant tsp of baking powder
1/2 tsp salt
2/3 cup oil
6 T apple sauce
1/2 tsp + 1/2 tsp cinnamon
juice of half a lemon
1/2 cup of toasted almonds, chopped


Peel, core and dice the apples. Toss them in a mixture of honey, 1/2 tsp of cinnamon and a teaspoon of lemon juice. Set aside and let marinate until ready to bake.

Sift together the dry cake ingredients except sugar. In another bowl, cream the yolks and sugar. Add in the oil and apple sauce and whisk to incorporate well. Add the dry flour in three parts, whisking the batter each time to mix completely.

In a clean bowl, whips the whites till they form stiff peaks. Gently fold in 1 tablespoon of batter into the whipped whites to loosem them. Add whites in two parts to the batter, gently folding just enough to mix and until there are no streaks of the whites visible in the batter.

Quickly fold in a third of the apples and the nuts into the batter in just 3 turns. Do not over mix; the cake will lose the fluffiness.

To assemble, place the remaining apples in one layer at the bottom of the baking pan. Pour the batter over the apple layer. Bake at 350 degrees for an hour and a half or until a toothpick inserted in the middle comes out clean.


Something sweet, something savory for Diwali - Cashew Burfi and Murukku

Picture 013-3

Diwali, the Indian festival of lights, is my favorite festival of all, and perhaps the grandest of all for most Indians as well :-). As a kid, the festival meant new clothes, uncensored gluttony and crackers day & night. As an adolescent, it was about catching up and hanging out with family and friends, exchanging wishes and sweets and ofcourse, unadulterated gluttony (that doesn't change with age!).

When I moved out of India for work, initially, I would get sorely homesick around this time. I missed the festive air, the happy laughter, the meeting and greetings and someone else who would make all the goodies ('palagarams' in Tamil) that I could devour. Slowly, as we made more and more friends, and many Indian ones, and I started taking an active interest in cooking, I could recreate some of that magic in our little abode here far away from home in India.

Wishes were exchanged with family over the phone and with friends in real time. We host little parties for each other to share our homemade or store bought sweet as well as savory creations. For me, this is the time when I show my love through my hand made palagarams and I look forward to it very very much!

Diwali is also the one festival when sweets are made ahead of time and it isn't taboo to dip in prior to the day. That made it extra special! Imagine, weeks (before and after) of indulgence rather than just a day or two. For every other festival, all goodies are usually made on the day and first presented to the god/goddess whose day it was before us mortals could sample it. But, Diwali transcends any one deity and even religion. Technically it is a Hindu festival but is celebrated by one and all because it is a festival of Lights and not of God ....

Picture 028-1

Every year, for Diwali and only for it, I make Cashew Burfi. Kaju Katli (cashew fudge) is my absolute favorite Indian sweet. I love it for the pure cashew flavor and not-too-sweet bite. So, for that little sweet thing, I make my version of it with milk. I reduce down full fat (yes, had to be full!) milk slowly, oh very slowly, to a thick sticky consistency. All the love is in that slow reduction because you have stir constantly for hours to get it right! :)

And, for something savory, because you need that balance, I make Murukku, crispy fried dough spirals. Traditionally, it is fried in ghee (clarified butter) (Well, technically everything is cooked in ghee for the occasion to signify the indulgence). Murukku is an irresistable snack, much like the potato chip. You just cannot eat just one! :)

Picture 041-1

So that's how we spent the day ... snacking on murukkus and indulging on cashew burfi while catching up with friends and wishing everyone a wonderful and prosperous year ahead!! And, I send you the same love and wishes to you all!

From my family to yours - Have a joyous year ahead filled with many many delights and happy memories!! :))


Cashew Burfi

8 cups whole milk
1 cup cashews + another 1/4 cup for garnish
1/2 cup sugar
pinch cardamom powder

Roast cashews for 15 minutes in an oven preheated to 350 degrees until golden brown. Cool to room temperature. Process the cashews with the sugar to as fine a powder as you can.

In a wide heavy bottomed pan, slowly reduce the milk over low heat to one-fourth its volume. Do not use a non-stick pan for this. It always burns at the bottom and burnt milk does not make any good sweet! When the milk is reduced, stir in the cashew mixture and cook for 30 minutes more until the mixture comes away from the sides of the pan and very thick.

Pour into a greased cake pan. Once the mixture has cooled enough to handle, spoon out about a tablespoon of the burfi onto to lightly greased hands and roll into a ball. Top each with a roasted cashew as garnish.


Murukku

Picture 037-12 cups rice flour
1/2 cup urad dal (split gram) flour
1/4 cup semolina
3 T garbanzo flour
2 tsp cumin seeds
1 tsp caraway seeds
1/4 cup sesame seeds
3 T butter, melter
1 T salt
1/2 tsp asofetida powder
3/4 cup water or more as needed

Sift together the flours, semolina and salt. Stir in the cumin, caraway and sesame seeds. Add the melted butter to make a crumbly mixture. Slowly add water to make a dough that just comes together; much like a shortbread dough. Grease your palms and knead the dough until it comes away from the sides of the pan. Cover with a damp towel and let it rest for 30 minutes.

When ready to fry the murukkus, heat oil in a small wok to 350 degrees. Maintain the flame at low. If you have a murukku maker, choose the shape you want and fill with the dough. You can get one of these handy little things at an Indian store. If you can't find one, fret not, you can use a cookie press as well.

On a clean plastic shape, press out shapes and then transfer into the oil. Fry until golden brown and there are no bubbles in the oil. Remove onto a kitchen towel to soak any excess oil. You can store in an airtight container for a week.


Tea with Mom - Dates & Nuts Spice Cake


I was thinking about what to make for High Tea, the October Monthly Mingle event hosted by Meeta of What's for Lunch Honey and Aparna of My Diverse Kitchen. Then I read this post by one of my favorite bloggers Deeba, who aside from being a fabulous baker is a full time mom with two adolescent kids.


The post made me laugh and also brought back memories of my own teenage years. Honestly, and I am sure my mom will concur, they were anything but turbulent but I did have my rebellious moments! My chosen mode of attack was the hunger strike. Frankly, my stomach was the only instrument in my control, but, inadvertently (scout's honor!), I think I chose THE most effective weapon I could have. I don't think my mother would have succumbed as much to tirades and tantrums as my stubborn refusal of nutrition.

Perhaps, if I had made a rational argument for my cause, I could have avoided much heart burn (mine from a growling stomach and hers from my strike), but, that somehow never seemed an option at all. On the flip side how rational an argument can you make when you are stuck between being a child and wanting to be a grown-up?! :).

Anyway, despite all those teething pains, I think my mom is proud of who I am now and what I became and all that would not have been possible without her support and her discipline :). So,I thought it would be fitting to dedicate this post to my mother and every other mom out there with a teenage child going through the transition into maturity.

My mom is not very fond of sweets but I am. And, in the fashion of true compromise, I decided to make something sweet but not too sweet. For as long as I remember, mom would buy Lion dates packet for me (because I was low on hemoglobin). So, I made a date cake with lots of nuts and raisins and a hint of spice. It's best eaten warm with a cup of flavorful tea and a lot of gossip and catching up! :)

Here is to my mom and every other in the world. Because, no one will ever love us like our mothers!! :))

Dates & Nuts Spice Cake

3/4 cup all purpose flour
3-1/2 T butter
3/4 cup date paste or chopped pitted dates
3 T roasted chopped cashew nuts
handful of raisins
1 tsp five spice
1/4 tsp baking soda
4 T brown sugar (if you like it sweeter, you can add a couple more)
1 egg yolk
1/4 cup + 1 T water

Pre-heat the oven to 350 degrees.

Sift the flour, spice, baking soda together. Toss in the chopped nuts and set aside. In a small pan, combine water, butter, sugar and date paste. Over low heat, cook the mixture until the butter has melted, sugar dissolved and the mixture is smooth. Fold in the raisins. Remove from and cool for 10 minutes.

Add the date mixture and the yolk to the flour mixture and combine well. Pour into a greased 4 inch spring form pan and bake for 30 - 35 minutes until cake is springy to touch.

Let the cool for 10 minutes in the pan and then transfer to a rack. Sprinkle powdered sugar over the top and serve warm with butter.

Fig and Apricot Cheesecake


Mmm.. I like spring cleaning my pantry, mostly because it gives me the perfect excuse and free reign to use a bit of creativity and make a bunch of stuff. After all, 'It'll go bad soon, if not used' is a compelling argument that even my husband cannot find a counter for! Ha!

So, when I found the mostly unused bar of cream cheese (which, I diligently buy every time I run out of it, even though I never have bagels at home!), I decided to make cheesecake. That happened Monday. But, I dragged my feet about it for two days, because, plain vanilla cheesecake sounded boring and nothing inspiring struck me. Yesterday, I walked by the organic grocers next door and saw these luscious black figs and that sent my mind into overdrive.

I tossed around pairings in my mind to go with the figs in the cheesecake and settled on apricots and port wine sauce. I made fig and apricot cheesecake topped off with a warm port wine - cognac sauce. I actually used a short cut for the sauce using some of the incredibly good porto et cognac gelee that I picked up in Montreal. But, you can easily make a simple reduction of port wine, sugar and a tiny bit of lemon juice.

This was a really fun, rewarding exercise. I made up the recipe as I went and substituted some of the traditional ingredients (that I did not have on hand) with stuff that was in my pantry. To my honest surprise, some of them worked much better than I expected.

I was out of Graham crackers and so, I made the crust with ground glucose biscuits (Parle G for those familiar with it!) and almonds. It came out nice and crumbly and perhaps, because of the glucose in the biscuits and not to mention the almonds was more flavorful than the traditional cracker crust.

The fig and apricot reduction puree was flavored ever so slightly with dark rum and honey. I blended the puree into the cheese cake mixture and for added punch made a lava center of it as well. So, even if the mild flavors of the fruits are not sufficiently bold in the cheesecake the puree brings them to the forefront with every bite.

I actually intended to make one 4 inch size cheesecake but I ended up with about a cup more than I needed of the cheese cake mixture. So, I spooned the remainder into a couple of ramekins over a base of the fig-apricot puree. Something like an upside down cheese cake, only I could not really get it out of the ramekins. Nevertheless, it was just as yummy scooped out of the containers directly as it was pretty arranged in the traditional layers!


Fig and Apricot Cheesecake with Port Wine and Cognac Sauce
(one four inch cheese cake)


** The cheesecake bakes in a water bath. To prevent seepage into the crust, generously and tightly wrap the spring form pans with foil. **

For the crust:
6T ground glucose biscuits
1 T ground almonds
1/2 tsp almond extract
2 T melted butter

For the fig-apricot puree:
1/2 cup fresh ripe figs
3-4 dried apricots
1 T honey
2 tsp rum
1/4 cup hot water

For the cheesecake:
6 oz cream cheese, room temperature
1 egg, room temperature
1/4 cup mascarpone cheese, room temperature
1/2 tsp almond extract
3/8 cup sugar
pinch of salt

2 tsp of warmed port wine-cognac gelee or reduced port wine sauce
Preheat oven to 350 degrees and heat water for the water bath. Soak apricots for about 10 minutes in hot water. Remove and chopped the apricots and the reserve the water. Grind biscuits and almonds to a fine powder and with fork mix in the butter and extract to a meal like texture. Press the crust into the base of the spring form pan. If you like crusty sides as well, make more of the mixture as needed.

Bake the crust for 10-15 minutes until it is golden. Meanwhile, mix together the figs (chopped), apricots, honey and about 3 tablespoons of the apricot water in a small sauce pan. Cook the fruits over low heat till they become very soft and the water reduces to 1/2 the original volume. Cool the mixture and puree it.

Beat the cream cheese and sugar together until creamy and smooth (about 3 minutes). Add the egg and beat to incorporate. Blend in the mascarpone, almond extract and salt. Mix in about a third of a cup of the fig-apricot puree.

Wrap the spring form pan tightly in foil. Spoon in the cheese cake batter into the pan until half full. Spread about 2 T (I eyeballed it) of the fig puree over the batter. Fill the rest of the pan with the cheesecake batter.

Place the pan inside a larger oven proof pan. Pour hot water so it comes up to half the level of the cheesecake filling. Bake for 45 minutes until almost done. Turn off the oven and let the cake gradually cool down for an hour inside it so it doesn't crack on top. Remove the pan from the water bath and cool on rack to room temperature. Refrigerate for atleast 6 hours, overnight is better.

Before serving, lightly warm the port wine sauce and spoon over the top of the cheese cake. Garnish with a couple of fig halves and serve.

No-sweat dessert - Buttermilk Panna Cotta


Summer is slowly ebbing away in the Northern hemisphere and the cool of fall and winter later (brrr!!) is setting in. I know I should have written about this perfect summer dessert earlier, but, I was bit distracted with travel et all. But, here it is, now, just in time to squeeze it into your menu before the warmth runs away to vacation in the South (those South of Equator, What perfect timing!, you say, surely).

So, why is it perfect? Simple; It is light, refreshing, served cold, and needs no oven to set; a real no-sweat dessert! It all started with a craving for panna cotta on a hot summer day. I did not have cream at home and did not feel like stepping out into the humidity to get a carton. But I did have buttermilk, which, got me thinking. Soon enough (well... not counting the overnight gelatinizing) I made myself a nice dessert.

Even the husband was impressed! To put that in context, he doesn't much like buttermilk in anything other than biscuits. I, however, can drink it straight with a just a bit of salt. Have you tried that?! No? You must. It is incredibly refreshing! It cools you system and helps your digestion too. Back to the panna cotta now; so while he wasn't exactly thrilled about the concept when I mentioned it, he definitely devoured the end result pretty greedily!! LOL...

I made simple vanilla flavored panna cotta this time. But, I imagine this will pair beautifully with citrus flavors as well. The buttermilk makes the panna cotta not too sweet, so something sweet on top works nicely with it. I served it with some chunky blueberry coulis I had made earlier (chunky because I like the texture of cooked blueberries and so decided to not strain the coulis. But, if you don't swing that way, feel free to go traditional). Honey or warm apricot jelly would pair well as well.


Buttermilk Panna Cotta with Chunky Blueberry Coulis
(4 servings)

Panna Cotta:

1 T water
3/4 tsp unflavored gelatin
1 cup whole milk
1/4 cup sugar
1 cup buttermilk
1 tsp vanilla extract

In a small cup sprinkle gelatin over the water and set aside for about 10 minutes to let the gelatin soften.

Meanwhile, heat milk and sugar in medium saucepan over medium-high heat, stirring constantly until sugar dissolves. Increase heat and bring just to low boil, stirring occasionally. Remove from heat and add the softened gelatin. Stir until gelatin dissolves. Cool the mixture to lukewarm. Stir in buttermilk and vanilla. Divide the mixture among four 4 oz ramekins. Refrigerate atleast 5 hours; overnight is better.

When you are ready to serve, dip each ramekin into hot water to loosed the panna cotta. Using small sharp knife, cut around panna cotta in each ramekin. Invert the panna cotta on to the dessert plate. Top with coulis/honey/warm jelly and serve alongside summer fruits.

Blueberry Coulis:

1 pint blueberries
1/2 cup sugar
2 T honey
1/4 cup water
2 tsp lemon juice
2 T rum

In a small saucepan, mix the berries, water, sugar and honey. Bring the mixture to a boil, lower the heat, and stir in the lemon juice. Let the mixture simmer for 6 -7 minutes and let it thicken a bit. Remove from the heat and stir in the rum.

At this point, you can leave it chunky like I did, or strain out the syrup.