French

Pâté et Pain - Daring Cooks Bake in June

Chicken & Mushroom Terrine with Italian Bread 2

Yes indeed! We were asked to bake this month for the Daring Cooks Challenge. I am not all sure if it should not have been one for Daring Baker's but, I suppose, given it is a savory dish, it was a cooking challenge?!....

Our hostesses this month, Evelyne of Cheap Ethnic Eatz, and Valerie of a The Chocolate Bunny, chose delicious pate with freshly baked bread as their June Daring Cook’s challenge! They’ve provided us with 4 different pate recipes to choose from and are allowing us to go wild with our homemade bread choice.

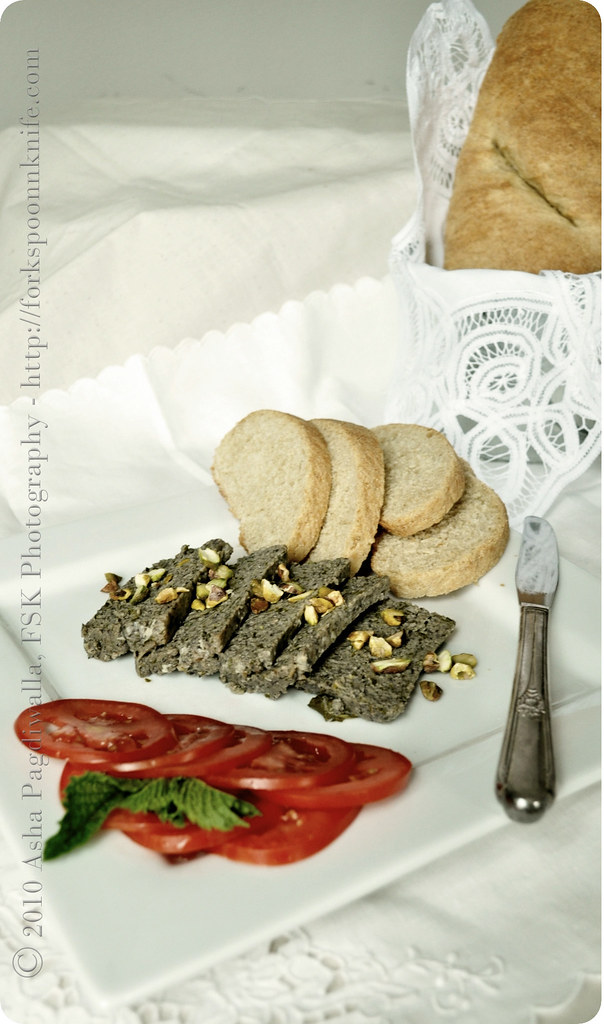
We were challenged to make atleast one Pâté from the listed options and one bread of our choice. Most of the recipes for pâtés use liver, which, I quite dislike. So, I scoured around for a recipe that did not use innards and such. Quite accidentally, I remembered a book I had bought a while back in an effort to make chicken more fun to eat (for me!). There I found a recipe for a Terrine made with chicken meat and mushrooms...

Chicken & Mushroom Terrine

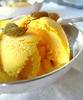
There is some debate on what is and isn't a Pâté. You may have noticed, I mentioned Terrine before; that's what I made..

Our hostesses said - Technically, a terrine is a baking recipient, usually ceramic or porcelain, with a lid – but it can also refer to the contents of the recipient. And some of the pâtés we looked at were designed to be unmolded onto a dish and then sliced, while others were meant to be left in the jar or baking dish they were prepared in, and merely used as a spread.

Wiki concurs - In French or Belgian cuisine, pâté may be baked in a crust as pie or loaf, in which case it is called pâté en croûte or baked in a terrine (or other mold), in which case it is known as pâté en terrine.

Italian Bread

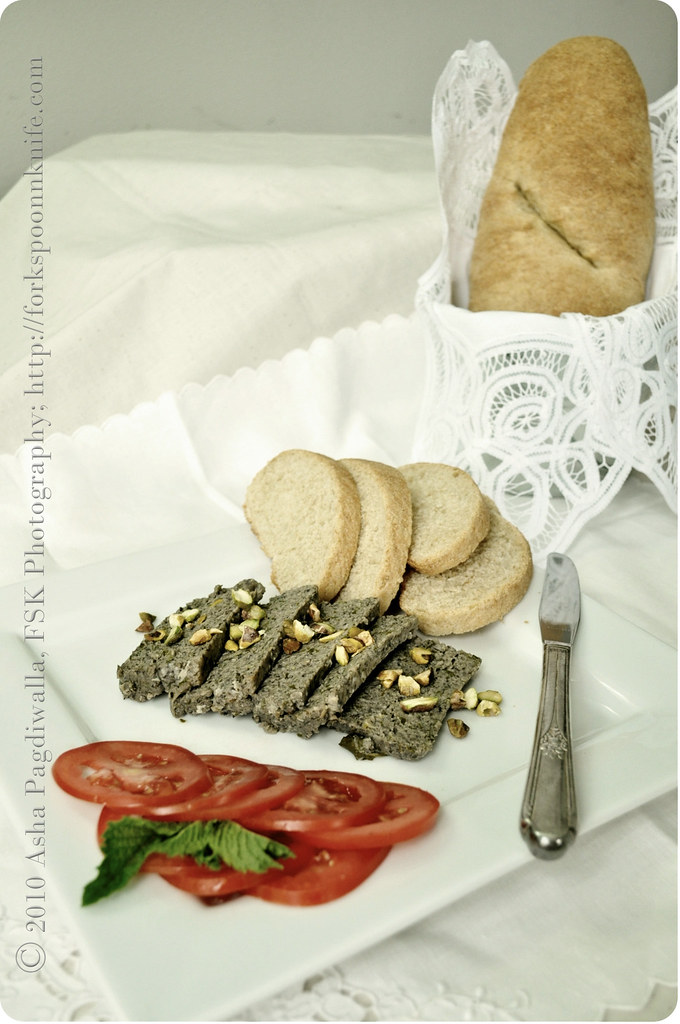
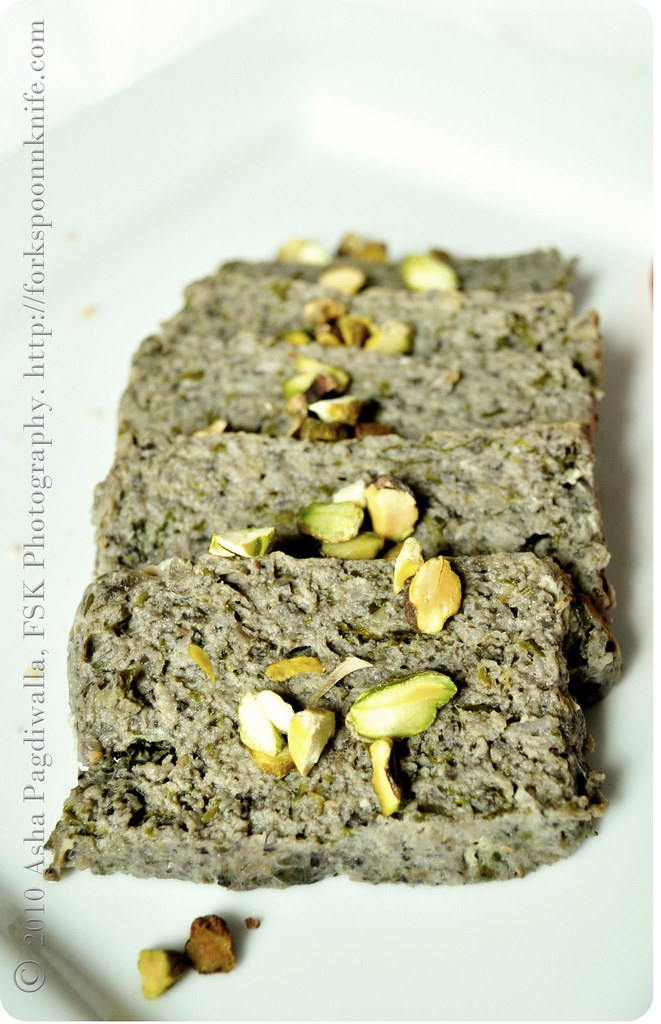
I decided to proceed with my Chicken and Mushroom Terrine recipe! For authenticity, I did bake it in a porcelain mold... I used chicken thigh and leg meat and combined it with red wine sauteed portobellos. Now, the recipe I was adapting called for fresh herbs and since I was making this late in the night, I was a bit short on most herbs.

I used what I had, which made for interesting flavors. I used mint and Fenugreek. Fenugreek is a bitter herb that is used a lot in Eastern cuisine. We use the leaves and seeds for cooking and it's bitterness is supposed to be good for the digestive system (or perhaps that was just made up so children would eat it!). Nevertheless, it does have much nutritional value.

As to the bread, Mr.FSK does not much gravitate towards the crusty varieties. So, I chose a bread with a softer crust. I have wanted to try baking an Italian loaf and this seemed the opportune moment. I followed Peter Reinhart's recipe to the T (Although I did substitute a third of the flour with whole wheat). We loved the bread. It was soft, filling and flavorful. And, the house was filled with such lovely aromas! :))

Chicken & Mushroom Terrine with Italian Bread

Verdict: A fun challenge, especially since I love to bake, even though, it was a bit hot around here for this exercise. I enjoyed the pâté but, perhaps, because I did not use the fattier innards, it was a tad dry and not creamy like I am used to it being. If I ever get the courage to cook liver and such, I may give it another try.. The bread, on the other hand, is definitely a repeat! :)

P.S. : I am sending my Italian loaf to YeastSpotting..


Chicken and Mushroom Pâté

2 shallots, chopped
2 generous cups, mushrooms, chopped (no stems)
1/4 cup dry, red wine
2 chicken thighs, skinned and chopped
1 egg
2 T fresh breadcrumbs
2 T chopped mint
4 T chopped fenugreek

optional: For serving, pistachios, tomatoes and mint

Preheat oven to 350F.

Cook the shallots and mushrooms with wine in a sauce pan over low heat until the vegetables are soft and the mixture is dry. Transfer to a food processor along with the chicken, egg, breadcrumbs and seasoning and process coarsely. Add the herbs and pulse briefly.

Spoon into greased molds and smooth the surface. Cover with foil and bake fpr 30-35 minutes until juices are no longer pink. Remove from oven and place a weight on top leave to cool and then chill.

Serve with roasted pistachios, thinly sliced tomatoes and garnished with mint.

Ratatouille Mille Feuille

Ratatouille I

One of my all time favorite movies, I must say, is Ratatouille. Well, the fact that the plot is built around food and the theme of "Anybody can Cook!" is in itself appealing to the foodie me. But above and beyond that, it even managed to portray furry Emile and his kind as lovable fur balls and something to be coddled rather than the scary creatures that they really are! :)

In fact, I had not heard of the French country classic until this movie and as soon I saw it (with much laughter and warm fuzzy feeling), we went hunting for French bistros that served the dish. Well, in NYC, you are apt to bump into every style of French cuisine; from rustic to haute couture!

So, we ended up in this little cafe that we now simply, simply love - Cafe Henry in the Village. They serve the rustic version (like the one Ego had in this childhood) wrapped in crepes with or without meat. It's delicious and satisfying! However, I am yet to find a place that serves the fancy version that Emile executed.

Ratatouille single portion

So, I decided to make it myself and in the process, debut my new Le Creuset baking pan. I have the one in red one; love it! It's just fab! I just made a simple version, based on what I saw in the movie. But, try as I might, I could not plate it as beautifully as he did.. LOL.. But hey, it looked gorgeous in the pan! :))


Ratatouille Mille Feuille
(serves 3 for appetizer-ish portions)

1 zucchini
1 Italian eggplant (the long, thinner variety)
1 tomato
1 medium sized russet potato
1 cup home made tomato/marinara sauce (you can use the
recipe here skipping the bacon)
2 T olive oil
2 tsp Italian seasoning
salt and pepper to taste

Evenly spread the tomato sauce as a base at the bottom of a 8 inch oval baking pan. Using a mandolin (careful!) thinly slice all the vegetables. In my experience, it is easier to cut the soft fleshed veggies, like egg plant and tomato, with a knife rather than a mandolin.

Arrange the veggies, in an overlapping fashion, alternating all the vegetables, around the circumference of the pan. Fill the entire dish with the overlapped pieces.

Brush the top with the olive oil. Season with salt, pepper and Italian seasoning. Cover the pan with foil. Bake at 350F for 30-35 minutes, until the zucchini is translucent. Let rest for five minutes, unwrap and serve with sauce.

Romancing with Rose & Basil Seed Macarons with Cherry Cream Cheese

Rose & Basil Macs with cherry cream cheese filling - first pic 2

I am in Chennai now.. where is the weather is just pleasant enough to sit comfortably without a fan and the cool evening breeze from the sea makes the leaves on the trees in my garden sway to an enchanting tune. Ofcourse, I am also being happily pampered by the family in every which way; lots of good food and my every wish fulfilled immediately. And, I have a good few weeks of this to cherish. Oh it's bliss! Ok, perhaps it won't last forever; once the novelty of my presence wears off but until then I am enjoying it all very very much! :)

I landed here yesterday and am still soaking in everything, including the time zone. So far, I have been walking through the day in a sorta jet lagged haze.. I wake up, eat, sleep, eat, sleep and try to get to used to the new day and night system. Pretty good living eh?! I think so too. I'll be fine in a couple of days though, fret not! :)


Now, despite all that, I cannot ignore my blog and leave all you loyal readers (surely there is one?!) hanging until I get back to the States? No siree, that isn't done! So, I made a few things, before departing on my vacation, to be posted about, in leisure, this month.

So, am starting off with Macarons! Remember my tribulations and eventual triumph, with Cardamom and Ganache macarons, in making this delicate French desserts?! Even as I was whooping with joy in October over having made a successful batch of these tricky treats, I decided that I would not be a one-trick pony. I have to recreate that magic if only to justify the baker in me. I must show who is the master and ofcourse the thought of playing with new flavor combinations just made it all very appealing.

Rose Mac shells

Jamie's and Deeba's call for a monthly macaron challenge, Mac Attack, served just the perfect excuse to try my hand at them again. They have dedicated a whole blog, MACTWEETS, to macs with a lot of information on getting it right. And ofcourse, a blogroll of all the wonderful and creative Mac Bakers!

My entry for this month's challenge is Rose and Basil Seed Macaron with Cherry Cream Cheese filling. The inspiration behind it was the Indian Falooda. Falooda is a refreshing summer drink made with cold rose milk, vermicelli and puffed basil seeds. It is an adaptation of the Persian dessert Faloodeh and was brought to the Indian subcontinent during the Mughal period. I love rose milk and the basil seeds add an interesting texture element like the tapioca baubles in Chinese bubble tea!

Macs in a line

I had a packet of Falooda mix at home and it struck me that it would great flavor experiment for macarons! And, so it came to be. For this challenge, I also wanted to stress test my learnings from my last success. My first few unsuccessful attempts were with Helen's recipe and I wanted to try the recipe again and see if I had after all grown in macaron baking. Oh! I am happy to report that it worked. I am not a one-trick pony after all!!!

So ladies and gentlemen, without further ado, I present to you my newest Mac creation! :) Much love to you all!

Before you go, I have another piece of news to share. Foodista has invited me to contribute to their Best of Food Blogs Cookbook. This is a real dream opportunity for me but to make it real, I need your help in voting for me and my recipes to be part of the book. I have submitted some of my favorites. I will be greatly obliged to you if you could vote for me! Thanks very much for your love!!

Kaju Barfi Indian Cashew Fudge (Kaju Barfi) - Vote here

Pesto RollsPesto Rolls - Vote here

Pumkin barley risottoRoasted Pumpkin and Barley Risotto - Vote here

mango & Saffron ice creamMango and Saffron Ice Cream - Vote here


Rose and Basil Seed Macarons with Cherry Cream Cheese

**
I used rose sugar for flavoring. If you can't find any, you can use 1/2 tsp of rose extract. Add to the egg whites and whip as per directions.
**

For the macarons shells:
basic macaron shell recipe adapted from
Tartelette)

1 egg white
1 T granulated sugar
1/2 cup + 1/2 T powdered sugar
1/3 cup + 1/2 T ground almonds
2 tsp rose flavored sugar for the meringue
2 tsp rose flavored sugar + 1/2 tsp basil seeds for garnish

For the whites: the day before (24hrs), separate your eggs and store the whites at room temperature in a covered container. If you want to use 48hrs (or more) egg whites, you can store them in the fridge.

In a stand mixer fitted with the whisk attachment, whip the egg whites to a foam, gradually add the sugar until you obtain a glossy meringue. Do not over beat your meringue or it will be too dry. Combine the almonds and powdered sugar in a food processor and give them a good pulse until the nuts are finely ground. Add them to the meringue, give it a quick fold to break some of the air and then fold the mass carefully until you obtain a batter that flows like lava or a thick ribbon. Give quick strokes at first to break the mass and slow down. The whole process should not take more than 50 strokes.

Test a small amount on a plate: if the tops flattens on its own you are good to go. If there is a small beak, give the batter a couple of turns.

Fill a pastry bag fitted with a plain tip (Ateco #807 or #809) with the batter and pipe small rounds (1.5 inches in diameter) onto parchment paper or silicone mats lined baking sheets. Sprinkle with the crushed sugar or violet petals. Preheat the oven to 280F. Let the macarons sit out for 30 minutes to an hour to harden their shells a bit and bake for 15 to 20 minutes, depending on their size.

Let cool. If you have trouble removing the shells, pour a couple of drops of water under the parchment paper while the sheet is still a bit warm and the macarons will lift up more easily do to the moisture. Don't let them sit there in it too long or they will become soggy. Once baked and if you are not using them right away, store them in an airtight container out of the fridge for a couple of days or in the freezer. To fill: pipe or spoon about 1 big tablespoon of butterceam in the center of one shell and top with another one.


Cherry Cream Cheese filling

1-1/2 oz cream cheese at room temperature
1 T butter at room temperature
1/8 tsp burgundy powder food color
2 tsp kirsch or cherry liqueur
4 T powdered sugar

Whip the ingredients together to make a smooth paste. Refrigerate until ready to use. Fill a ziplock bag and snip off a small bit. Pipe out the filling onto the cooled macaron shells. Top with another and press gently to seal.


Mac Love

Leek and Prosciutto Tart with Warm Apple Cider for Fall Brunch


Yay! I made it! You wondering what? Well, I have been planning this brunch for the past three weekends and something or other just kept pushing it on to the back burner. This weekend, I finally decided to tell my Google calender whoz boss! I put my foot down, cleaned out all the scribbles in my schedule and got down to the baking....

Now, you wonder, why all this fuss to get this done. After all, brunch is my favorite meal of the weekend especially because it has such a leisurely note to it! Well... the thing is, Meeta of What's for Lunch Honey is hosting a Brunch today and I don't want to be late for it. It isn't polite, is it?; to RSVP yes and then show up after the party! Very very not acceptable in my hostessing and guesting book....


Anyway, I do get like that when I have to host or cook something by a deadline. I frazzle about and worry till the table is all set and ready. Even then, I can think of just a few more garnishes and little stuff that would make it better and more so... The never ending quest for perfection, ain't it?! :)

Anyway, I have made the typical brunches / breakfasts at home; pancakes and bacon, over easy eggs with Mornay Sauce, Eggs on Toast with Fruit Sauce and more. I love brunching at home. It is my favorite meal, as I said, but I do not particularly relish standing in a line for hours to get it (as inevitably happens at any decent brunch place in the city on a weekend.. New Yorkers' discretionary patience just amazes me sometimes :)))..


This time, I wanted to make something different but still brunch-y. I wanted to play with eggs, cheese, ham and fresh fruit, all typical brunch items for me.

So I thought, why not bake? And, ofcourse, quiche immediately popped into my head. That's a bit more lunch-like for me and quite heavy. So I went with a lighter tart and to bring in that bacon/ham angle, I chose the delicate and flavorful prosciutto paired with mild leeks and goat cheese. And the fruit; well, it's Fall and you guessed it.. Apples!! I made fresh warm spiced apple cider with a hint of citrus...

So, that is the lovely brunch I plan to take to Meeta's - Leek & Prosciutto Tart with Arugula Salad and Warm Apple Cider....


Let's toast!


Leek & Prosciutto Tart
(makes 2 six inch individual tarts or 1 9inch tart)

1 butter crust (Recipe here)
4 oz goat cheese, room temperature
2 T sour cream
2 eggs, room temperature
1 small leeks, sliced fine
1/4 lb prosciutto
1 tsp Worcestershire sauce
1 tsp pimento sauce or other hot sauce
salt and pepper to taste

Chop the prosciutto into squares, reserving a slice or two for garnish. Cream goat cheese and sour cream together to get a smooth, creamy mixture (this is why, it is important to bring the cheese to room temperature). Add the eggs one at the time and whisk to incorporate fully. Add the rest of the ingredients and mix well.

If you are making individual tarts, cut the tart crust accordingly. Blind bake for 10-12 minutes at 400 degrees. Cool the tarts a little, so the eggs don't scramble. Fill and bake at 350 degrees for 25 minutes until cooked and the center is set.

Rest for a few minutes till cool enough to handle. Serve the tarts, garnished with the reserved prosciutto and a few leek rings..

For the salad, I dressed the arugula simply with balsamic vinegar, salt and pepper and topped with toasted pignolis.

Fresh Spiced Apple Cider

4 Macintosh apples, cored, peeled, diced
1 tsp lemon juice
2 slices of lemon
1 tsp sugar
2 cups water
1 stick cinnamon
5 cloves
1 star anise
2 cloves cardamom

Puree the apples with the lemon juice to as fine a consistency as you can. Add a little water if needed to get the blades working. In a sauce pan, add the apple puree with the rest of the ingredients and bring to a boil. Simmer for 10 minutes with lid on. Cool for a few minutes and let the flavors steep. To serve, strain the cider through a fine sieve. Garnish with a slice of lemon or some mint.

Oil tarts are in!


Yes, you read it right! Not butter.... oil. When I first came across the recipe for a tart shell with oil instead of butter on Passionate about baking, I was instantly inspired to make it! I have long wondered if oil could create that wonderful flakiness that is most loved about a butter crust. After all, the Indian paratha has a lovely flaky texture and is made with oil or ghee. So, armed with a recipe to help me out with the measures, I was ready to test my hypothesis .

Recently, a friend of ours introduced us to a small farmers' market in midtown Manhattan (52nd street between 8th and 9th avenues). Bang in the center of prime real estate, it carried fresh produce at admirably reasonable prices. When I found a butternut squash that was perfectly sized for two, I was sold!

As soon as I saw the squash, I decided to make roasted butternut squash tart with the new healthy version for the crust. That crust experiment unfortunately, did not go as well as I expected. As I followed the recipe, I felt that the dough was a bit dry and tough and it stayed that way after being baked as well. The tart filling was moist but the crust was way too hard. But, I did not give up. I decided to give the oil tart another chance, this time, with some modifications.

For take #2, I decided to make rosemary tart with a layered filling of ricotta, marinara and zucchini, like a lasagna. I made the crust with minced fresh rosemary. I also upped the amount of water and substituted half the olive oil with canola oil. The result was much better than the previous time.

The crust was soft, supple, light yet flavorful. But, it did not turn out flaky! A butter crust definitely has a better texture and arguably a richer flavor. However, I liked the oil crust quite a bit. It is a pretty good, much healthier version, which, is a whole lot easier to work with (especially with no constraint to work quickly to prevent the butter from melting!).


Oil Tart Crust
adapted from
here

1-3/4 cup spelt wheat flour
1 tsp salt
1/2 tsp pepper
1 tsp minced rosemary
1/2 cup + 2T ice cold water (I did this more on a add as you go basis. So it could be a bit more or less)
1/8 cup olive oil
1/8 cup canola oil
2 tsp oil

Sift together flour, salt, pepper and rosemary. Add the oil and mix it in with a fork. Add water slowly, mixing it in and kneading the dough until it comes together into a ball.

Turn the dough out onto a lightly floured work surface. Using a floured rolling pin, roll the out into a circle large enough to fit your tart pan. Transfer the dough carefully into the prepared pan and line it without stretching. Trim off the excess dough with the rolling pin. Refrigerate for atleast 30 minutes.

Blind bake the crust in oven preheated to 375 degrees for 15 minutes. Remove pie weights and continue baking for five more minutes. Dial down the oven to 350 degrees.

Fill the tart with filling of choice (suggested recipes below). Return to oven and bake for 30 to 40 minutes until the tart is fully cooked. If using mozzarella on top, reserve the cheese until the last 7 minutes, then sprinkle over and cook until the cheese is melted.

Remove the tart from the oven and cool for 5 minutes. Sprinkle the top with parmesan, chives or other garnish and serve.

Roasted Butternut Squash Tart

1 oil tart crust blind baked
1-1/4 cup homemade (or store bought) marinara sauce
1 cup roasted butternut squash dices
3/4 cup grated fresh mozzarella cheese
2 tsp chopped chives or scallions for garnish

Spread half the marinara sauce at the bottom of the tart shell. Top the layer with the roasted butternut squash pieces and then a half cup of grated mozzarella. Spread another layer of marinara sauce.

Bake for 30 minutes. Sprinkle the remaining cheese over the tart in the last 7 minutes and finish baking. Garnish with chives/scallions and serve.


Zucchini Lasagna Tart
adapted from
101 cookbooks

1 oil tart baked as above
1 medium zucchini thinly sliced
1-1/4 cups marinara sauce
1-1/4 cups ricotta cheese
1 T grated parmesan cheese

Spread half the ricotta cheese on the bottom of the tart. Then, spread a third of the sauce over it. Line the zucchini slices around the tart in an overlapping fashion.

Repeat the cheese, sauce and zucchini layers. Top of with the remaining sauce and bake for 30 to 40 minutes until tart is fully cooked.

Let tart rest for 5 minutes, garnish with grated parmesan and serve.